
library, part 04: fixing the window & wall
03.08 showcasing mad patching skillz, yo
 click to see the full photo gallery[NOTE: this project was done in conjunction with the guest room & studio project.]
As with the guest room, the window in the soon-to-be library needed new sash cords. By the time we got to that window, we'd had plenty of practice removing the window trim and installing new sash cords. So you'd think it would go smoothly.
HAHAHAHAHAHAHAHAHA
This was the first window we'd come across that had the casement pockets completely plastered over behind the window trim. The guest room window casements looked like they had been plastered over, as well, but someone must have accessed them at some point because there was a rough hole to provide access and one of the sash weights had be replaced with a random metal piece for a weight.
Anyway, it meant we had to poke a hole in the plaster to access the casement pockets on each side. Plaster isn't hard to break through, but you do have to be careful not to accidentally make the whole wider that the trim piece that will cover it. You also don't want to just remove a whole bunch of it since it provides a nice layer of insulation to prevent drafts coming through. Our windows are already inefficient enough without making the problem worse.
Everything went fine until Sal accidentally lost the end of the sash cord down inside the casement before we had a chance to thread it through the sash pulley. To make matters worse, the sash weight fell on top of the cord. Which meant trying to finagle the sash cord through a narrow opening, unable to see anything, to reach a cord that's almost five feet below and held down by a heavy metal object. An unbent clothes hanger isn't long enough to reach that far, nor strong enough to pull a cord out from under a weight, even if you do manage to hook it somehow.
I'm not sure how he managed it, but just when we were ready to give up and just bust through the plaster at the bottom and be done with it, Sal managed to hook a clothes hanger into the end of the sash weight itself and draw it up to a point that he could pull the cord through. I think he may have celebrated afterward with a beer or three. We finished up the repair and moved on to the next, exceedingly careful not to repeat the mistake.
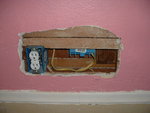
There was also a significant wall repair to be done. On the wall shared with the bathroom, there was a hole about a foot long and nine inches high. This was actually our doing...or rather, that of Dad and Mo, who had installed a much-needed outlet in the bathroom (which didn't have one) when they came to help us start work on the attic several years ago. They ran the electrical from below since it's open from the basement, so somewhat accessible, but they needed to access to the wall from behind in order to finish installation of the outlet. Since they already had to put a hole in from the library side, they installed an outlet here, too, which was nice because there's definitely a shortage of outlets, particularly newer ones.
Anyway, I'm sure there's a "right" way to patch plaster and lathe, but I had opted to use a piece of half-inch drywall we had on hand from the attic project. I fitted the piece for the hole very carefully to fit it in as tightly as possible, using a metal file to shape it to the shape of the hole as precisely as possible and leave as little gap as I could between the patch and the wall around it.
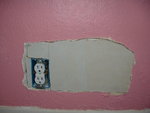 click to see the full photo galleryUnfortunately, the drywall was a little too thick to sit flush with the rest of the wall, so I had to spend quite a bit of time contouring the back side of the piece to help it sit flush. It was worth the effort, however, since the patch fit in so tightly that it stayed in place without anything to hold it there. I used mesh tape along the seams and hot mud for the initial seam filling to ensure it would hold well and stay solid. A few additional thin coats of mud so there wouldn't be a slight depression in the wall and it was soon done. I didn't try to mimic the texture of the rest of the wall so it's still noticeably smooth surrounded by the pebbly texture of the rest of the wall, but once it was painted, it wasn't noticeable. (Well that, and there would be a big piece of furniture in front of it anyway.)